Related Posts Plugin for WordPress, Blogger...

Tuesday, August 31, 2010

Tuesday Tip


Todays tip comes from my experience while on retreat a few weeks ago. I had planned to make as many cards as possible for this blog- you know, use my time well. I had a productive day on Friday, and was ready to do the same on Saturday. I sat down and prepared to "CREATE" and it was not good. Nothing came together. I literally spent 10 hours trying to make one card. This is the 10 hour card:


I used a sketch and I had help from those sitting around me. I know it doesn't look like a 10 hour card, more like a 10 minute card, but there you go.
Sometimes it is okay to stop when you aren't feeling it. Walk away and wait it out. Creative juices will flow again. I promise.


Monday, August 30, 2010

Mojo Monday 154


The ribbon used is tempting turquoise, but it isn't photographing true to color for some odd reason.
This card remind me of a day at the beach....Coronado ... I miss San Diego some days.

Here is my simple card for today's Mojo Monday sketch.

I used:
Stamps: Just Believe #120453
Paper: Whisper White #100730, Crumb Cake #120953, Patterns Designer Series Paper  Stack -Brights #117155
Ink: Tempting Turquoise Marker #100058, Certainly Celery Marker #105106, Crumb Cake Marker #120967
Other: Stampin' Dimentionals #104430, SU Photo Corner Punch (retired), Nestabilities (non-SU), Tempting Turquoise grosgrain ribbon (retired)

Thanks for stopping by and looking :-)

Color Combo Monday

Sunday, August 29, 2010

Quick Card Sunday

I used:
Stamps: Just Buzzin By #113228
Paper: Basic Black CS #121045, Whisper White CS #100730
Ink: Stazon Black #101406, So Saffron marker #105114, More Mustard Marker #100076
Other: So Saffron ribbon (retired), Scallop Edge Border Punch #119882, Aquapainter #103954

Saturday, August 28, 2010

Step It UP! Saturday


I used:
Stamps: Just Believe #120453 clear, #116948 wood
Paper: Patterns Designer Series Paper Stack-Brights #117155, Old Olive CS #100702, Rich Razzleberry CS #115316, Basic Black CS #121045, Whisper White CS #100730
Ink: Old Olive Marker #100079, Rich Razzleberry Marker #120970
Other: 5/8" Satin Ribbon Old Olive #117292, Uni-ball Signo Gel Pen #105021, Crop-a-dile #108362, Dimentionals #104430


I had a request to show how I did the ribbon for the step 2 card. I didn't show it on the video because I try to keep the videos at or below 10 minutes AND the punch I use is a retired product. I took a few pictures showing what I use and an alternative if you don't already own this particular punch. I hope this is helpful.


This is the step 2 card partially assembled


This punch makes two little holes 1/4" apart. It makes it easy for adding a little bit of ribbon.


I usually turn my punches over to see exactly where my holes will go.


You can also use the small hole punch on a crop-a-dile to get the exact same hole size. You will just need to measure the distance between the two holes.
I will often mark the card using the SU hole punch, but if the card has 3 layers it is difficult to punch through with the punch, so I use the marks and punch with my crop-a-dile.


Put the ribbon through the holes and tie a simple knot.


I usually pop this part of the card up a little by using dimentionsals.


Thanks for stopping by and looking :-)

Friday, August 27, 2010

Use It UP! Friday...


Friday is the day I post a project using retired or "other" stuff I have in my craft room. As a Stampin' UP! demonstrator I like to use items available in our current catalog. I can rememeber being frustrated as a new stamper, trying to copy a project I loved, only to find it was made with retired items. So I understand the need to be current. I also know that after stamping and crafting for a time we have a stash of things that we love that are retired or that someone gave us or we aquired someway or another. LOL
Today is the day I encourage you to USE IT UP!

I made this card while on retreat a few weeks ago. I spent 10 hours on Saturday trying to come up with card ideas. It was not a good creative day. I made one card (not this one- you will laugh when I post the 10 hour card) that day and felt like my creative juices were running dry.
The next morning I got up early and started looking at card sketches. I found a Mojo Monday sketch that I really liked and started to go...
I love this card! I mean I really love it! That doesn't happen very often.


I used:
Paper: Crumb Cake #120953, Not Quite Navy #101722, Very Vanilla #101650, Bella Bleu (retired)
Stamps: Elements of Style #120045 -clear, #118611 -wood
Ink: Not Quite Navy marker #100059, Certainly Celery marker #105106, Sahara Sand marker #105105
Other: Square Lattice Embossing Folder #119976 (thanks Monika), brads (craft store), XL Scallop Oval Punch # 119856, Large Oval Punch # 119855, Dimentionals #104430

You could easily re-create this card using other Designer Series papers. If you have Woodland Walk #117389, or Blueberry Crisp #117392 or Elegant Soiree #117163 - any one of these current DS papers would work beautifully. Add in some Antique Brads #117273 and you could create you own version.

Thanks for stopping by and looking :-)

Thursday, August 26, 2010

Technique Thursday


Unexpected materials.....
So, this isn't really a technique as much as it is a challenge to get inspiration from an unexpected source.
I was looking through old scrapbooking magazines this weekend and saw an ad for a paper line.
I looked at it and saw Certainly Celery and Not Quite Navy. And so started the inspiration from an unexpected source.
My card is very simple, it was just meant to demonstrate how to use non-traditional card making supplies.

I pulled out Sense of Time stamp set because I wanted a big area of the magazine page to be visable. Besides I love the sentiments in Sense of Time and jump at the chance to make a card using them.
I inked with versamark, used black embossing powder, and carefully heat set the image. I say carefully because the paper is so thin, and could easily burn if you are not paying attention.
I cut out the image...


I pulled several colors that I thought could work with my image to get a feel for what I wanted...
I selected Not Quite Navy and Certainly Celery. Here is my finished simple card:


I used:
Paper: Magazine ad, Not Quite Navy #101722, Certainly Celery #105125, Very Vanilla #101650
Stamps: Sense of Time #113804
Ink: Versamark #102283, Not Quite Navy marker #100059, Certainly Celery marker #105106
Other: Perfect Polka Dots Embossing Folder #117335, Certainly Celery Ribbon #109050, Slot Punch (retired), Black Embossing Powder #109133

Thanks for stopping by and looking :-)

Wednesday, August 25, 2010

Wednesday Organize


I love the new clear mount stamps! I love the containers they come in.
I ordered Word Play and it came in 2 containers. After I assembled the stamps I found they easily fit into one container. I sliped the paper into the back of the first container and that way I could see the entire contents of the one set.
So I had an extra clear stamp container.....
what to do, what to do?
Do you know what?
One color family of markers (10 of them) fit perfectly into a clear mount case.
Perfectly!


lookee at that.... perfect isn't it?


Even closed, it is a perfect fit.

Hope you find this helpful.

Thanks for stopping by and looking....

I enjoy reading comments :-)

Tuesday, August 24, 2010

Tuesday Tip - How to Tie a Great Bow


Today's tip will be on how to tie a neat and tidy bow...
I saw this on a sewing blog and I use it all the time for bows.


A becomes the first loop for the bow, wrap B around the front of the A loop and back thru the hole to make the other loop.


It is not easy to take pictures of tying a bow AND take pictures at the same time.
I needed an extra pair of hands. I hope this makes sense and is helpful.

Thanks for stopping by and looking :-)

Monday, August 23, 2010

Color Combo Monday 2


Post links to your creation if you use the Color Combo. I would love to see what you create.

Thanks for stopping by and looking :-)

Mojo 153


I used:
Stamps: Elements of Style #120045 clear #118611 wood
Paper: Old Olive #100702, Rich Razzleberry #115316, Very Vanilla #101650, Patterns Designer Series Paper Pack-Brights #117155
Ink: Regal Rose Marker #105108, Rich Razzleberry Marker #120970, Old Olive Marker #100079
Other: Old Olive Satin Ribbon 5/8" #117292, brads (I don't know where these came from but the Antique Brads #117273 would work perfectly, Dimentionals #104430

Old Olive is cut to 4.25" x 11" and folded at 5.5" to make the standard 4.25" x 5.5" card base. Old Olive ds paper cut just a hair under 4.25" x 5.5" to give it a thin Old Olive mat.
I inked the stamp using markers....Old olive for leaves, Rich Razzleberry for the inside portions of the flowers, and Regal Rose marker for the outer part of the flowers. I huffed and stamped on a 4" x 4" Very Vanilla card stock. I cut the 4" x 4" stamped image into 2" x 2" sqares and I trimed them a bit more on two side to allow them to fit on the 4" x 4" Rich Razzleberry mat.
I stamped the hummingbird with Rich Razzleberry and fussy cut him out and popped him up with dimentionals.

Thanks for stopping by and looking :-)

Sunday, August 22, 2010

Quick Card Sunday - Autumn Harvest


A quick card ready to stamp whatever sentiment you need.

I used:
Paper: Elegant Eggplant #105126, More Mustard #100946, Very Vanilla #101650
Stamps: Autumn Harvest #110372, Season of Joy #110384, Small Script (retired)
Ink: Elegant Eggplant #105210 pad/#105110 marker, Bravo Burgandy #105214 pad/ #105109 marker, More Mustard #103162 pad/ #100076 marker, Garden Green #102272 pad/ #100080 marker, Chocolate Chip #100908 pad/ #100071 marker
Other: Aquapainter #103954, Large Oval Punch #119855, Scallop Oval Punch #119856, Hemp Twine #100982, more mustard button (retired), eggplant grosgrain ribbon (retired)

Base in Elegant Eggplant cut to 8.5" x 5.5", folded to make a card base measuring 4.25"x5.5"
Layer 2: More mustard cut 5.25"x4"
Layer 3: Very vanilla cut 3.5" x 4.75"

Friday, August 20, 2010

Step It UP! Saturday


I used:
Stamps - Upsy Daisy #111710
Paper - Pacific Point #111350, Sahara Sand #121043, Basic Black #121045, Whisper White #100730, Blueberry Crisp DS #117392
Ink - Pacific Point marker #120968
Other - Mat Pack #105826, Paper-Piercing Tool #116631, Brads (neutrals) #119736, Grosgrain ribbon black #109027


Thanks for stopping by and looking :-)

Use It Up! Friday... Happiness Always


Hey stampers, the idea behind "Use It Up!" is that as a stamper I know we all have things we love and keep that are not currently being sold by demonstrators. Sometimes it is hard to find ideas to 'use it up'. So on Fridays, I will show a project with one or more items that have been retired.
I hope you find this helpful.

I used:
Paper: Crushed Curry CS (retired), Very Vanilla CS #101650, Chocolate Chip CS #102128
Stamps: Medallion #115223, Happy Harmony (retired), Butterfly (retired)
Ink: Chocolate Chip #100908, Crushed Curry marker (retired), Bravo Burgandy marker #105109
Other: Dimentionals #104430

note: I stamped the butterfly twice, colored it the same with crushed curry and bravo burgandy. One was stamped on the same piece of paper as the senitment (the one that is matted), the other was cut out and attached to the first butterfly with a dimentional cut in half. I bent the wings a bit to show the layers.


Thanks for stopping by and looking :-)

Thursday, August 19, 2010

Technique Thursday


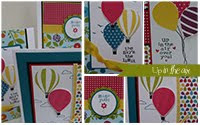
This card was made using a faux silk technique.
This is done by stamping your image onto tissue paper and then painting with an aquapainter.
When I use the aquapainter, I do so without adding water to the aquapainter.
I keep a little medicine cup with a teaspoon or two of water and dip my aquapainter into the water.
I am better able to control how wet and diluted the ink becomes by doing it this way.
With this project in particular, I think it is key.


Stamp the image onto the tissue paper with StazOn black ink


Using an empty(dry) aquapainter, I dip it into water and squeeze out the excess with my fingertips.
I then dip into ink. I use a white plastic thing but have been know to use the tops of stamp containers. They work perfectly if you slip a sheet of white copy paper in them to give you a white background. I use the markers to put ink on the container and then I am good to go.


Starting in the area where I want the darkest colors to be, I begin to paint. I will move the brush back and forth until I reach the end of the petal area. Because I don't reload the brush of the aquapainter the ink gradually gets lighter.


I repeat the process with the green leaves except I use two different colors for the leaves. I wanted a less subtle look to the leaves so I used garden green and certainly celery.


After the coloring is finished and dry you will crumble the tissue paper up into a tiny ball.


Then carefully open it up and smooth it out


Use a glue stick on a piece of whisper white cardstock and adhere the tissue paper to the cardstock.
The wrinkles will give it the look of silk.


It is now ready to mat and use in a finished card!

I used:
Stamps - Asian Artistry (retired) but the flowers in Elements of Style #118611 w/#120045 c would work beautifully.
Paper - Whisper White #100730, Chocolate Chip #102128, Garden Green #102584, Melon Mambo #115320
Ink - Melon Mambo marker #121074, Garden Green #100080, Certainly Celery #105106, StazOn Black #101406
Other - tissue paper, ribbon - I used organdy but white taffeta would look beautiful #109070, Anywhere Glue Stick #104045, Scallop Oval Punch #119856


Thanks for stopping by and visiting. :-)