
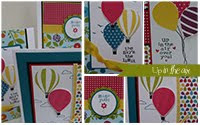
I used:
Stamps: Just Believe #120453 clear, #116948 wood
Paper: Patterns Designer Series Paper Stack-Brights #117155, Old Olive CS #100702, Rich Razzleberry CS #115316, Basic Black CS #121045, Whisper White CS #100730
Ink: Old Olive Marker #100079, Rich Razzleberry Marker #120970
Other: 5/8" Satin Ribbon Old Olive #117292, Uni-ball Signo Gel Pen #105021, Crop-a-dile #108362, Dimentionals #104430
I had a request to show how I did the ribbon for the step 2 card. I didn't show it on the video because I try to keep the videos at or below 10 minutes AND the punch I use is a retired product. I took a few pictures showing what I use and an alternative if you don't already own this particular punch. I hope this is helpful.

This is the step 2 card partially assembled

This punch makes two little holes 1/4" apart. It makes it easy for adding a little bit of ribbon.

I usually turn my punches over to see exactly where my holes will go.

You can also use the small hole punch on a crop-a-dile to get the exact same hole size. You will just need to measure the distance between the two holes.
I will often mark the card using the SU hole punch, but if the card has 3 layers it is difficult to punch through with the punch, so I use the marks and punch with my crop-a-dile.


Put the ribbon through the holes and tie a simple knot.

I usually pop this part of the card up a little by using dimentionsals.

Thanks for stopping by and looking :-)


7 comments:
Awesome! Thanks for the ribbon scoop. I have a Cropadile, so I'm all set! Thanks!
That is a beautiful card, in any variation! What sort of occasion(s) do you normally use it for and what do you write inside?
p.s. Can I use a regular hole puncher and just eyeball the spacing?
Hey Ginger, I normally eyeball everything so yes, by all means, just space what looks good to you.
I might send that card to a friend who is feeling down - a gentle reminder of faith. Or if someone had been praying about something and they saw that answered prayer, I might send it to them as a 'congratulations' type card. Kind of funny...a congratulations on answered prayer card.LOL!
I love your tiny mistakes because it makes you more real and accessible. And they were tiny.
Plus, the cards are absolutely gorgeous. Love the color combination and I really like the way you inked up the stamp. I tend to forget that I always have the option to use my markers that way. I get stuck in a rut way too easily.
I really enjoy checking on your blog each day. Keep up the great work!
Love it Joan. Just finished making something very similar using your example. One request for future videos. Would it be possible to post a link to a photo of all three step cards in your description? I wound up watching the video again, pausing on the one I wanted so I could refer to it. It would be nice to have a still photo to look at so I can see more detail as I work.
Thanks!
You got it, Sheri. What a great idea. I am shooting the next video tomorrow. I will be sure to have photos of each step card in the post in addition to the video :-)
This is wonderful. I did not know you could use markers like that on stamps. Now I know how you get your butterflies so pretty.
Post a Comment
Note: Only a member of this blog may post a comment.